A Step By Step Illustrated Guide to Ear Taping
There are many ways of taping Chinese Crested ears with methods varying from breeder to breeder; again based on the size and shape of the ear. Your breeder can direct you on their preferred method and should be willing to provide extra assistance if necessary until your completely comfortable with tapping the ears yourself
Remember: All Ear Tapping methods and requirements should be discussed and arranged in advance with your breeder prior to purchasing your puppy.
What follows below is one of the more well-known variations of the Ear Taping Process:
Step 1:
Shaving the Ear |
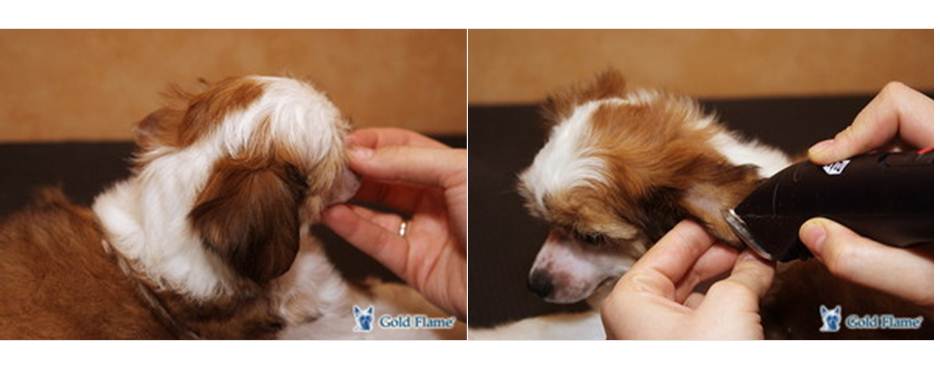
This will most importantly reduce weight of ears; while also making it easier and less uncomfortable for your puppy when it comes time to remove the plaster with which we will carefully tap the ears. As in the images below the fastest and safest method of hair removal for this purpose is a small trimmer. If you don’t have access to dog grooming equipment a gentleman’s electric moustache or beard trimmer is an acceptable substitute.
|
As puppies have a terrible tendency to wriggle, accustom them to the noise of the trimmer first by holding it close to the ear without cutting. Only when the puppy shows no reaction should you proceed. However, we would still recommend working from the base of the ears up towards the tips; in this way should the puppy jerk his head suddenly both his ears, your fingers and the rest of his head crest is less likely to be damaged.
A small scissors can also be used to trim the hair both inside and outside the ear. Though we would only recommend using an open tool such as this when both you and your puppy have grown accustomed and confident with the process
Step 2:Shaping the Outside Edges |
After trimming both sides of the ear, there should be a thin line of hair left on the edge of the ears. Again they should be removed by either scissors or trimmer whichever you’re more comfortable with see the image below as a guide: |
Once completed you should be left with a completly bald ear as seen below:
Step 3:Choosing your tape
|
Successfully tapping the ear depends as much on the tap used as on your technique. The best things plaster or tape should ideally be hypoallergenic and breathable (this lets the air circulate to the skin and is cleaner and more comfortable for your pup).
|

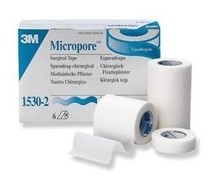
The adhesive plaster 3M-Micropore is made from nonwoven viscose and is traditionally used as a standard med kit bandage for small wounds, calluses and grazes. It is specially developed for sensitive and gentle skin; meaning it doesn't irritate even hypersensitive skin (which is ideal for your crested pup).
The main advantages of this bandage type are that its soft, flexible, hypoallergenic and breathable with strong adhesive qualities combined with easy removal leaving no damage or glue traces on the skin or surrounding hair. However any bandage type will do providing it displays the same properties
The main advantages of this bandage type are that its soft, flexible, hypoallergenic and breathable with strong adhesive qualities combined with easy removal leaving no damage or glue traces on the skin or surrounding hair. However any bandage type will do providing it displays the same properties
Step 4:Cleaning the Ear
|
Before tapping you need to wipe ears thoroughly with alcohol or other another disinfectant lotion. This will ensure that the ear is free from wax dirt or any remaining small hairs from trimming. Once the ears are bound any dirt left behind will be bound also, providing a perfect breeding ground for bacteria and infection- so take the time to inspect and protect their ears.
|
Step 5:Taping the Ear
|
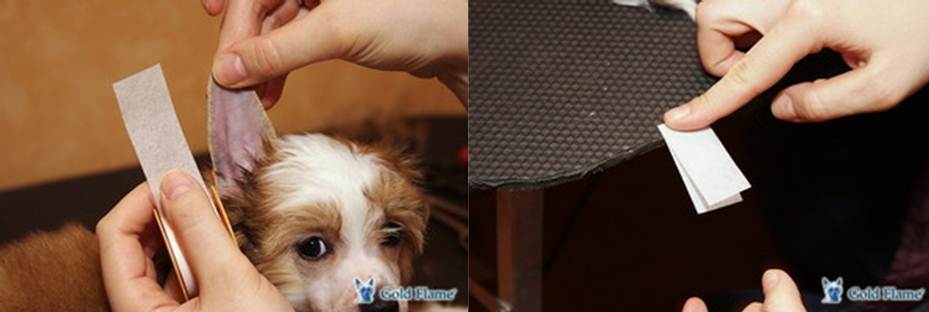
Cut off two strips equal to the length of your puppies’ ear to form a plaster. Stick ONE of the strips over the internal part of the ear, and then place the second strip plaster over it. Alternatively –cut off two strips, stick them together and then place in the ear (whichever you find less fiddly.
|
The plaster needs to be set deeply into the ear but not covering the ear channel
When you have the two ears successfully taped, cut off one more small strip of plaster slightly longer than the previous strips. Then gently wrap it around the outside of the ear near the base. Once again take time to ensure that the bandage is not too tight or closing off the ear canal.
If necessary a pencil or straw could be used as a guide around whom you can fold the ear and then wind the tape
If necessary a pencil or straw could be used as a guide around whom you can fold the ear and then wind the tape
Ultimately the ears should resemble two little "horns"J. If placement of the ears on the head is a concern (i.e. if they are carrier lower on the head than the standard 11 & 2 o’clock positions); a further piece of tape can be used to connect the two “horns” as a bridge.
Step 6: (Optional)Creating the Bridge
|
In this case once again take two longer pieces of tape; wrap the first around one ear in a single loop bringing the remainder of the tail over to the opposite ear and finishing with another single loop around the ear. Wrap the second piece of tape in exactly the same manner but from the reverse direction so that the two “sticky” sides face each other. |
Step 7:Maintaining the Taped Ear |
The Plaster should be left on for no longer than 3 consecutive days. Though if the bandage slips in puppy play, gets wet dirty or damaged it will be necessary to replace it sooner. |
To remove a plaster, take a scissors to slowly and carefully cut between the edges of the plaster. If for some reason the plaster proves difficult to remove there are a number of sprays and lotions available from your local pharmacy which can assist with dissolving the glue. Unless in dire need under no circumstances rip/yank/pull or force of the plaster this could damage the ear and more importantly hurt your puppy!
As in Step 4 the ear should be thoroughly inspected and cleaner of any buildup with alcohol or other antiseptic lotion. Should an infection have developed cease taping your puppies’ ears immediately until such time as this condition has been successfully treated.
As anyone with any experience of the breed will tell you there is nothing to be gained by attempting to continue taping a pup’s ear while an infection is present. Not only will the act of taping exacerbate and prolong the infection (as the ear will not be open to the air) but as with teething; ear infections cause the ears to grow hot and naturally droop not to mention of course the inherent discomfort will cause the pup to scratch at their ears dislodging the bandage and causing damage.
All in all if is far better to concede a few short days to your pups successful complete recovery than blindly proceeding on, risking the serious complications caused by an untreated ear infection. Ultimately the days lost to treatment will not significantly affect the final placement of your pup’s ears. This is why the both the initial cleaning of Step 4 and ongoing care and maintenance of Step 7 are supremely important.
Once removed rest the ear for a day and then replace exactly as detailed in the steps above. It is then a matter of “rinse and repeat” until the ears finally get stronger and set
Sourced and translated from the Russian with the permission of the author:
Author: Didenko Victoria
Kennel: Vittoria dell Amore- http://vittoria-dell-amore.jimdo.com
Photos by: Natalia Gubenkova http://www.goldflame.ru
© Vittoria dell Amore
Author: Didenko Victoria
Kennel: Vittoria dell Amore- http://vittoria-dell-amore.jimdo.com
Photos by: Natalia Gubenkova http://www.goldflame.ru
© Vittoria dell Amore


